

Uploading images to ChatGPT is easier than most people expect, yet many users still struggle to find the right option or understand why it sometimes doesn’t appear.
You might assume the feature works like email attachments or messaging apps, but it actually depends on your device, account, and interface.
In this post, I’ll explain exactly how to upload images to ChatGPT, step by step, while also clarifying requirements, limitations, and common issues.
Let’s begin with a quick overview before moving into the detailed instructions.
How to Upload Images to ChatGPT: Quick Steps Overview
Here’s a clear, fast understanding of the process so you can get started right away, whether you’re using a desktop or a mobile.
Step-by-Step Overview for Desktop and Mobile
Uploading images follows the same basic logic across devices, though the interface changes slightly.
- Open ChatGPT on your device.
- Start a new chat or open an existing conversation.
- Click or tap the plus (+) or paperclip icon next to the message box.
- Select the image you want to upload.
- Send the image and add a prompt to analyze or describe it.
On a desktop, the icon usually appears beside the text input field. On mobile, it shows up as a plus button near the chat bar. Once uploaded, the image becomes part of the conversation and can be referenced in follow-up prompts.
Supported File Types and Upload Limits at a Glance
Before uploading, make sure your file meets the platform’s requirements:
- Supported formats: PNG, JPG, JPEG, and non-animated GIF
- Maximum file size: Up to 20 MB per image
- Image limit per message: Typically up to 10 images at once
These limits help ensure faster processing and reduce the chance of upload errors. Larger or unsupported files may fail to upload or trigger error messages.
1. Upload Images to ChatGPT on Desktop (Web Interface)
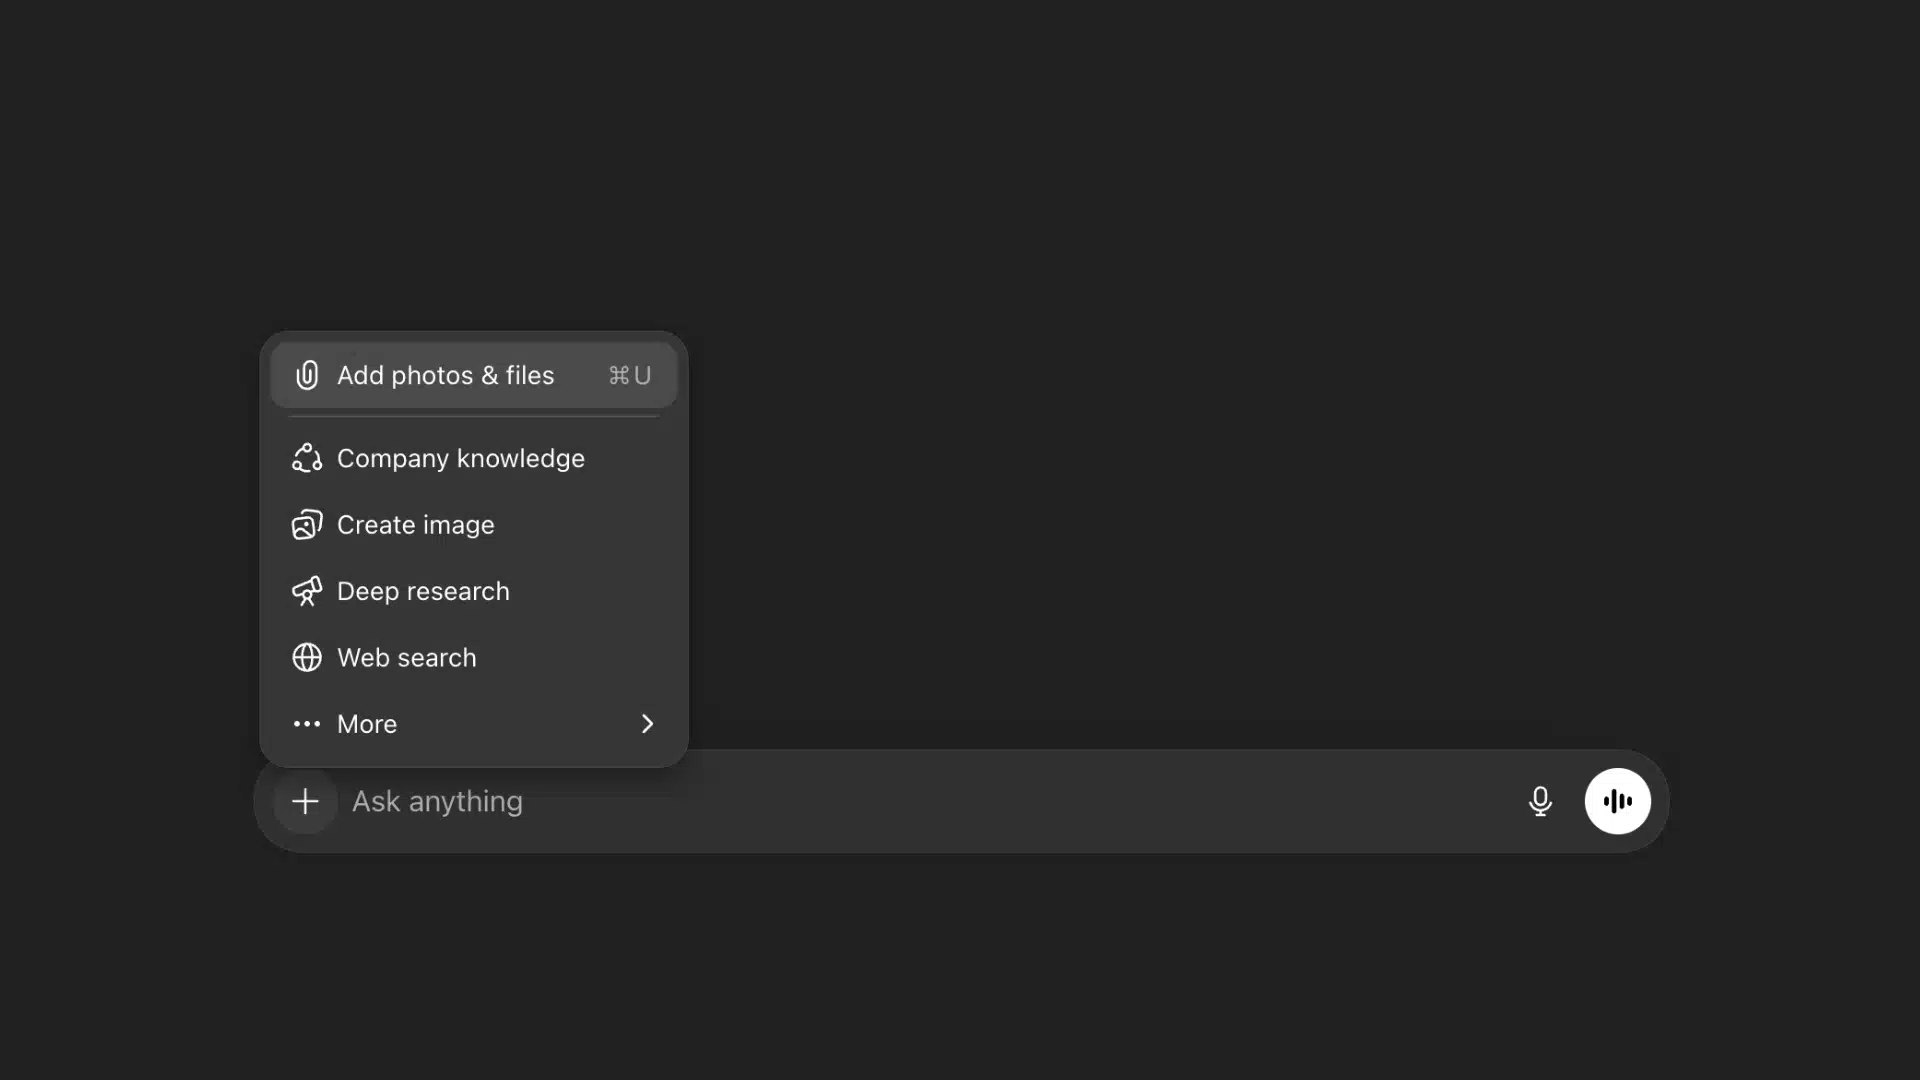
Uploading images on a desktop browser is straightforward, although the exact location of the upload icon may vary slightly depending on your layout and account features.
Locate the Upload Icon in the Chat Interface
After opening ChatGPT in your browser, look at the message input area at the bottom of the screen. You’ll usually see a paperclip or plus (+) icon next to the text field.
This icon appears only when the feature is supported by your selected model and account.
Some users may not see the icon immediately. In most cases, this happens because the selected model does not support image input or the feature is unavailable in the current interface.
Select and Attach Your Image File
Click the upload icon and choose the image file from your computer. Once selected, the file appears in the chat input area as a preview.
You can upload one image or multiple images at once, as long as they remain within the size and format limits. Larger files may take slightly longer to upload, depending on your internet speed.
Confirm the Upload and Interact with The Image
After attaching the image, type your prompt and click Send. ChatGPT will process the image and respond based on your request.
You can ask questions about the image, request descriptions, extract information, or analyze visual details. Follow-up questions can reference the same image without needing to upload it again.
2. Upload Images to ChatGPT on Mobile (iOS and Android)
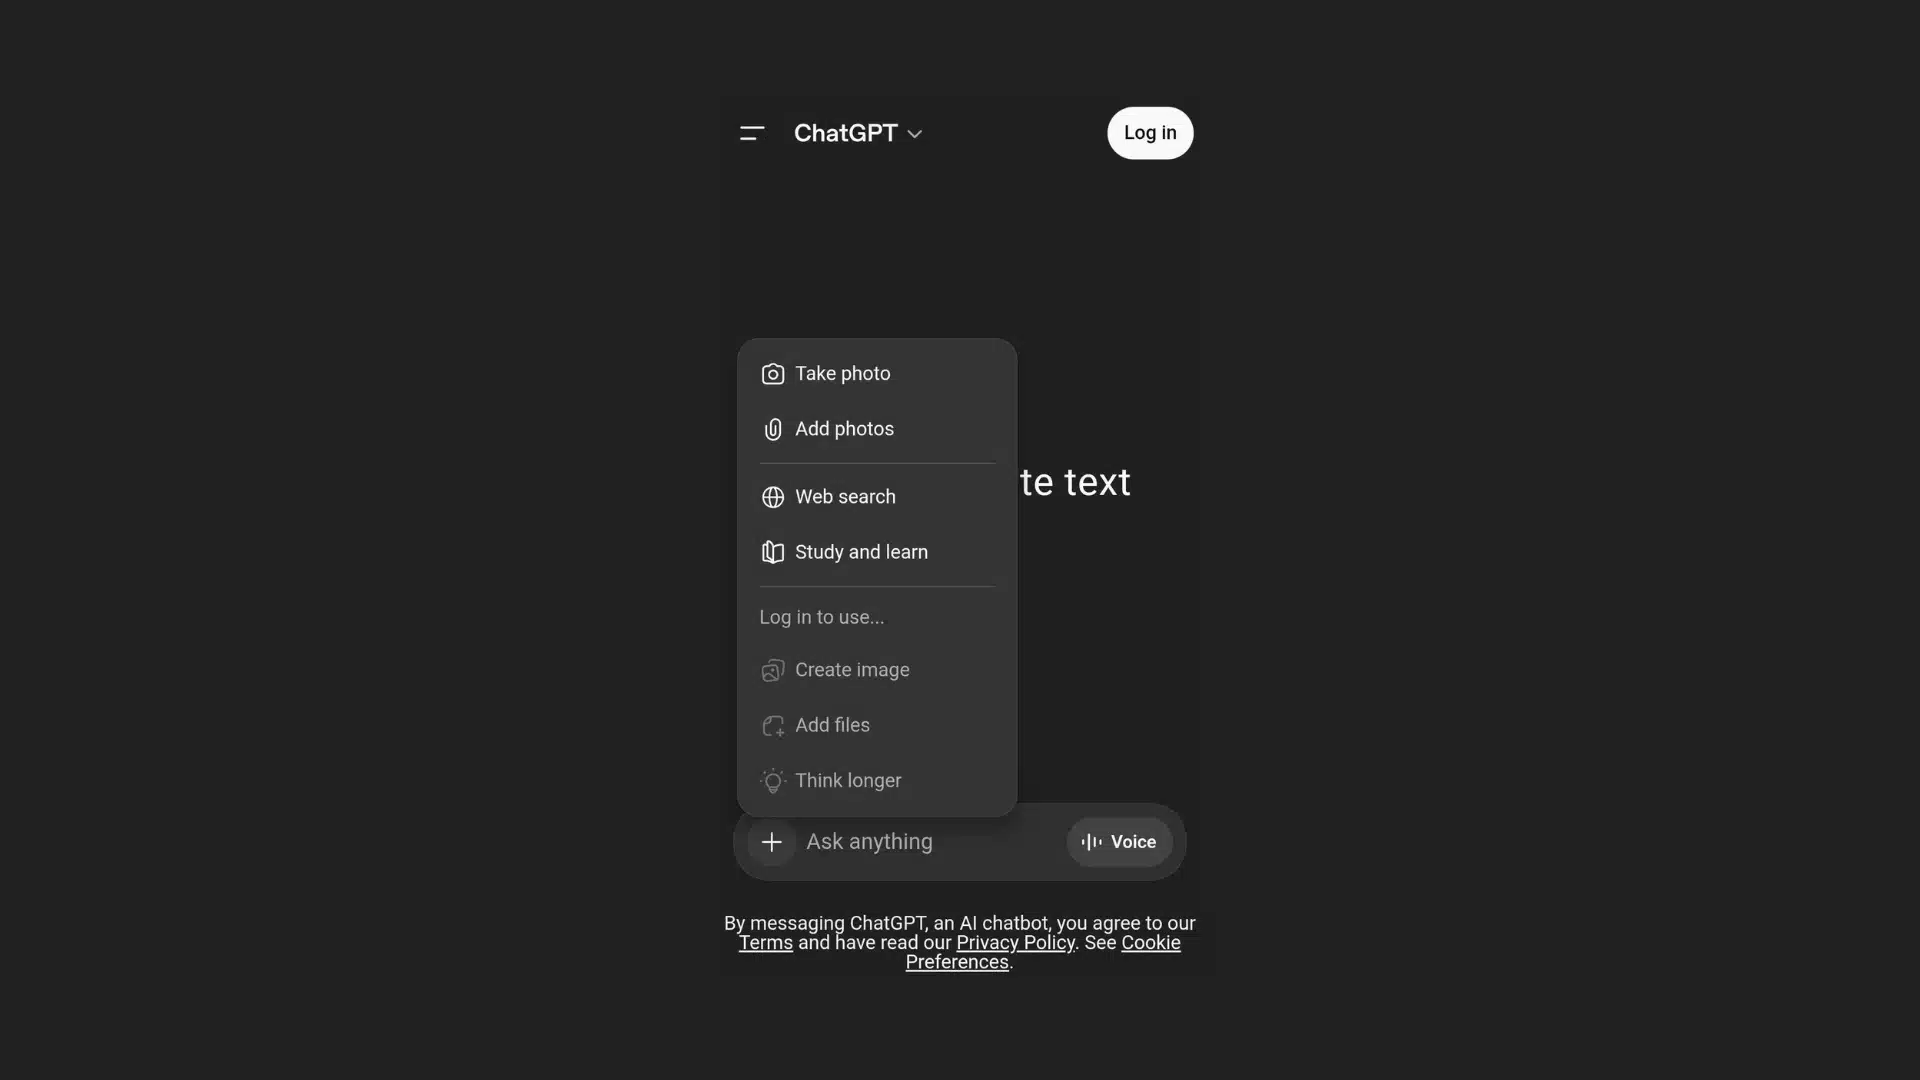
The mobile experience is similar to desktop but designed for touch interaction and device-specific features.
Tap the Plus (+) Icon to Add an Image
Open the ChatGPT app and start a conversation. Tap the plus (+) icon located near the message bar to open your device’s image selection menu.
The exact position of the icon may vary slightly depending on your device and app version, but it is typically placed beside the text input field.
Choose a Photo from Your Library or Camera
You can select an existing photo from your gallery or take a new picture using your device’s camera. This flexibility makes it easy to upload screenshots, documents, or real-time images for analysis.
The app automatically compresses images if needed to meet upload requirements, though very large files may still fail.
Send the Image and Begin Interaction
Once the image is selected, tap Send to upload it. After processing, ChatGPT will respond based on your prompt.
You can continue the conversation naturally, asking follow-up questions or requesting additional analysis. The uploaded image remains part of the chat context unless you start a new conversation.
Supported Formats, File Limits, and Upload Requirements
Understanding technical requirements helps prevent upload errors and ensures a smoother experience.
Supported Image Formats and Compatibility
ChatGPT supports common image formats such as PNG, JPG, JPEG, and non-animated GIF. These formats are widely compatible and optimized for efficient processing.
Unsupported formats, including animated GIFs or certain proprietary file types, may fail to upload because they require additional processing not supported in standard chat interactions.
File Size and Image Quantity Limits
Each image typically has a maximum size limit of 20 MB. You can upload multiple images in a single message, usually up to 10 at once.
Larger images may take longer to upload, especially on slower internet connections. If an image exceeds the size limit, the upload will fail or prompt you to select a smaller file.
Account and Feature Availability Requirements
Image upload availability depends on your account type, selected model, and platform.
Some versions of ChatGPT support image input by default, while others require specific models or features to be enabled.
If the upload option is missing, it often indicates that your current setup does not support image inputs. Switching models or updating the app usually resolves this issue.
Alternative Ways to Upload Images to ChatGPT
In addition to the standard upload button, there are other convenient methods to add images to your chat.
Drag-and-Drop Image Upload Method
On a desktop, you can drag an image file directly into the chat window. Once dropped, the image appears in the input area, ready to be sent.
This method works best in modern browsers and provides a faster alternative to manually selecting files. However, it may not function consistently in all browsers or operating systems.
Paste Images Directly from Your Clipboard
You can also paste images copied from your clipboard. For example, screenshots captured using keyboard shortcuts can be pasted directly into the chat.
This approach is especially useful for quickly sharing visual information without saving the file first. Compatibility may vary depending on your device and browser settings.
Why You May Not See the Image Upload Option
If the upload button is missing, the reason usually relates to feature availability rather than a technical error.
How Model Selection and Interface Affect Upload Availability
Image upload functionality depends on the selected model and interface. Some models support image inputs, while others are designed for text-only interactions.
When a model does not support images, the upload icon will not appear. Switching to a compatible model typically restores the feature.
Device, Region, and Account-Based Limitations
Feature availability can also vary based on device type, regional access, and account capabilities. Older app versions or unsupported browsers may not display the upload option.
Updating your app, switching browsers, or confirming your account supports image inputs often resolves the issue. In most cases, the feature appears once all requirements are met.
Troubleshooting Common Image Upload Problems
If you encounter issues while uploading images, the following solutions address the most common problems:
| Problem | Possible Cause | Solution |
|---|---|---|
| Upload button missing or disabled | Unsupported model selected, outdated app or browser, or feature not available on the account | Switch to a model that supports image uploads and update your app or browser to the latest version |
| File format or size errors | Image exceeds the maximum file size or uses an unsupported format | Convert the image to PNG or JPG and reduce the file size to meet platform limits |
| Upload failures or connection issues | Slow or unstable internet connection interrupting the upload process | Refresh the page, reconnect to a stable network, and try again; restart the app or browser if needed |
Wrapping Up
Uploading images doesn’t have to be complicated once you understand how the feature works.
By following the steps outlined above, you can confidently use image inputs for analysis, descriptions, or visual context.
Now that you know how to upload images to ChatGPT, try it yourself and see how visual interactions can enhance your conversations.
Explore the website for more step-by-step guides and tips to get the most out of ChatGPT and other AI tools.
Frequently Asked Questions
How do I upload images to ChatGPT?
Click or tap the plus or paperclip icon next to the chat box, select your image, and send it with your prompt. The image becomes part of the conversation instantly.
Why can’t I upload images to ChatGPT?
This usually happens when the selected model, account type, or platform does not support image uploads. Switching models or updating the app often resolves the issue.
Can you upload images to ChatGPT for free?
Yes, some versions allow image uploads for free, depending on the model and platform. Availability may vary, so check your account features and selected model.
What file types are supported when uploading images to ChatGPT?
Supported formats include PNG, JPG, JPEG, and non-animated GIF. Using these formats ensures compatibility and reduces the risk of upload errors.
How many images can you upload to ChatGPT at once?
You can typically upload up to 10 images in a single message, provided each file stays within the size limit. Larger uploads may require multiple messages.